Enhance your health with free online physiotherapy exercise lessons and videos about various disease and health condition
Orthopedic Physical Therapy
Orthopedic physical therapy includes treatment of the musculoskeletal system (which is made up of the muscles and bones of the body) that has been subject to injury or trauma. This includes sprains, strains, post fracture, post surgery and repetitive injuries. The areas of the body include the neck and back as well the extremities.
SOME RELATED TOPICS DISCUSSED HERE:-
Total Knee Replacement Rehabilitation
Hip Replacement Rehabilitation
Ankylosing Spondylitis Treatment
Avascular Necrosis of Femoral Head
Femoral Neck Fracture Physiotherapy
Orthopedics is a branch of medicine focused on the muscular and skeletal systems. Various types of disorders and injuries affecting our muscles, bones, and joints while discovering the important role physical therapy plays in managing orthopedic conditions.
The musculoskeletal system is composed of bone, cartilage, ligaments, muscle, tendons, synovium, bursae and fascia. This system is derived embryologically from the mesenchyme and is composed of soft and hard connective tissues. These tissues have evolved to serve two basic functions: structural integrity and stable mobility. The tissues are composite materials made up of cells lying within the extracellular matrix they produce.
Orthopedic physical therapist
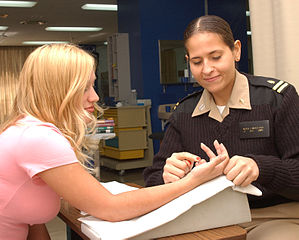
Orthopedic physical therapists diagnose, manage, and treat disorders and injuries of the musculoskeletal system as well as rehabilitate patients post orthopedic surgery. This specialty of physical therapy is most often found in the out-patient clinical setting. Orthopedic therapists are trained in the treatment of post operative joints, acute sports injuries, arthritis, and amputations just to name a few. Joint mobilizations, strength training, hot/cold packs, and electrical stimulation are modalities often used to expedite recovery in the orthopedic setting. Those who have suffered injury or disease affecting the muscles, bones, ligaments, or tendons of the body will benefit from assessment by a physical therapist specialized in orthopedics.
History Of Orthopedic Physical Therapy
Specialization for Orthopedic physical therapy in the U.S. occurred in 1974, with the Orthopaedic Section of the APTA being formed for those physical therapists specializing in Orthopaedics. In the same year, the International Federation of Orthopaedic Manipulative Therapy was formed, which has played an important role in advancing manual therapy worldwide ever since.
Orthopedic physical therapy practice, it takes the through a sequential thought process of diagnosis, patient history, physical examination, and, ultimately, treatment.
Orthopedic Physical Therapy Rehabilitation
- Pre and Post Surgical Care of all Orthopedic Conditions
- Balance/Vertigo Rehabilitation
- Postural Training
- Arthritis Management
- Back/Neck Rehabilitation
- Joint Pain Management
- Headache Management
- Manual Therapy/McKenzie Treatment
- Spinal Stabilization
- Muscle and Ligament Strains and Sprains
- Myofascial Release
- Auto Accident Injuries
- Work Injuries
Basic Orthopedic Physical Therapy Assessment

- Patient history
- Observation
- Examination of movement
- Special tests
- Reflexes and cutaneous distribution
- Joint play movements
- Palpation
- Diagnostic imaging
In Orthopedic Physical Therapy examining of the musculoskeletal system it is important to keep the concept of function in mind. Note any gross abnormalities of mechanical function beginning with the initial introduction to the patient. Continue to observe for such problems throughout the interview and the examination.
On Orthopedic Physical Therapy examination of a patient who has no musculoskeletal complaints and in whom no gross abnormalities have been noted in the interview and general physical examination, it is adequate to inspect the extremities and trunk for observable abnormalities and to ask the patient to perform a complete active range of motion with each joint or set of joints.
If the patient presents complaints in the musculoskeletal system or if any abnormality has been observed, it is important to do a thorough Orthopedic Physical Therapy examination, not only to delineate the extent of gross abnormalities but also to look closely for subtle anomalies.
To perform an Orthopedic Physical Therapy examination of the muscles, bones, and joints, use the classic techniques of inspection, palpation, and manipulation. Start by dividing the musculoskeletal system into functional parts. With practice the examiner will establish an order of approach, but for the beginner it is perhaps better to begin distally with the upper extremity, working proximally through the shoulder. Then, beginning with the temporomandibular joint, pass on to the cervical spine, the thoracic spine, the lumbar and sacral spine, and the sacroiliac joints. Finally, in the lower extremity, again begin distally with the foot and proceed proximally through the hip.
Use the opposite side for comparisons: it is easier to spot subtle differences as well as identify symmetrical problems. If there is any question, use your own anatomy as a control.
Glean the maximum information from observation. Concentrating on one area at a time, inspect the area for discoloration (e.g., ecchymoses, redness), soft tissue swelling, bony enlargement, wasting, and deformity (abnormal angulation, subluxation). While noting these changes, attempt to determine whether they are limited to the joint or whether they involve the surrounding structures (e.g., tendons, muscles, bursae).
Observe the patient's eyes while palpating the joints and the surrounding structures in Orthopedic Physical Therapy examination. A patient's expression of pain depends on many factors. For this reason the verbalization of pain often does not correlate directly with the magnitude of the pain. The most objective indicator of the magnitude of tenderness produced by presence on palpation is involuntary muscle movements about the eyes. Therefore, the examiner should observe the patient's eyes while palpating the joints and surrounding structures. With practice the examiner will become skilled in evaluating the magnitude of pain produced by the examination and will be able to do a skillful evaluation without producing excessive discomfort to the patient. Note areas of tenderness to pressure, and if possible identify the anatomic structures over which the tenderness is localized.
On Orthopedic Physical Therapy examination One should also note areas of enlargement while palpating the joints and surrounding structures. By noting carefully the consistency of the enlargement and its boundaries, one can decide whether this is due to bony widening, thickening of the synovial lining of the joint, soft tissue swelling of the structure surrounding the joint, an effusion into the joint capsule, or nodule formation, which might be located in a tendon sheath, subcutaneous tissue, or other structures about the joint.
While palpating the joints, note areas of increased warmth (heat). A method for doing this that will help even the most inexperienced to perceive subtle increases in heat is to choose the most heat-sensitive portion of the hand (usually the dorsum of the fingers) and, beginning proximally, lightly pass this part of your hand over all portions of the patient's extremity several times. As you proceed from proximal to distal, the skin temperature gradually cools. If you find an area becoming slightly warmer, this represents increased heat.
Have the patient perform active movements through an entire range of motion for each joint in Orthopedic Physical Therapy examination. Defects in function can be most rapidly perceived by having the patient perform active functions with each region of the musculoskeletal system. This reduces Orthopedic Physical Therapy examination time and helps the examiner to identify areas in which there is poor function for more careful evaluation.
Manipulate the joint through a passive range of motion only if the patient is unable actively to perform a full range of motion, or if there is obvious pain on active motion. In passively manipulating a joint, note whether there is a reduction in the range of motion, whether there is a pain on motion, and whether crepitus is produced when the joint is moved. Note also whether the joint is stable or whether abnormal movements may be produced in Orthopedic Physical Therapy examination.
Orthopedic Physical Therapy Examination of the Neck
1. Observe the patient as a whole.
2. Observe the neck and shoulders from in front and behind.
3. Palpate the front and back of the neck with the patient seated and the examiner behind.
4. Assess neck flexion by asking the patient to touch their chest with their chin.
5. Assess extension by asking the patient to look up and as far back as possible.
6. Assess lateral flexion to both sides by asking the patient to touch their shoulder with their ear.
7. Assess rotation by asking the patient to look over their shoulder, to the left and right.
8. Begin the neurological assessment of the upper limb by examining the motor system. This involves asking the patient to assume a certain position and not let you overcome it. Begin with shoulder abduction.
9. Shoulder adduction.
10. Elbow extension.
11. Elbow flexion.
12. Wrist extension.
13. Wrist flexion.
14. Finger extension.
15. Finger flexion.
16. Thumb abduction.
17. Finger abduction
18. Elicit the reflexes of the upper limb beginning with the biceps jerk.
19. Triceps jerk.
20. Brachioradialis jerk.
21. Assess co-ordination of the upper limb.
22. Test sensation of the upper limb and determine the distribution of any loss.
Orthopedic Physical Therapy Examination of the Shoulder
1. Observe the whole patient, front and back.
2. Observe the shoulder.
3. Observe the axilla.
4. Palpate for tenderness over the sterno-clavicular joint, clavicle, acromioclavicular joint, acromion process, supraspinatus tendon and the tendon of the long head of biceps.
5. Observe shoulder abduction from in front and behind, through the entire range of movement. Note the presence of difficulty in initiation or a painful arc.
6. Secure the scapula to assess gleno-humeral movement.
7. Assess flexion and extension.
8. Assess external rotation with elbows in to the sides and flexed to 90º .
9. Assess internal rotation by asking the patient to place both hands behind the head.
10. Assess internal rotation by asking the patient to reach over their opposite shoulder, behind the neck and behind the back.
11. Test biceps function by asking the patient to flex the elbow against resistance.
12. Test serratus anterior function by asking the patient to push against a wall, looking for winging of the scapula.
13. Test for pain with palpation of subacromial Bursa - indicates impingement of the rotator cuff.
14. The apprehension test standing. Abduct, externally rotate and extend the patient's shoulder while pushing on the head of the humerus with the opposite hand to test for anterior subluxation or dislocation.
15. Apprehension test lying down.
16. Assess any marked instability in the shoulder.Anterior - instability (moves too far forward);Posterior - instability (moves too far back).
Orthopedic Physical Therapy Examination of the Elbow
1. Observe the whole patient, front and back, looking especially for deformity.
2. Feel for tenderness.
Accentuate the pain of tennis elbow.
4. Tennis elbow: point tenderness.
5. Tennis elbow: pain on resisted extension.
6. Tennis elbow: pain on passive stretch.
7. Examine extension.
8. Examine flexion.
9. Examine supination.
10. Examine pronation.
11. Pivot shift of elbow (instability).
12. Provocative test for Cubital Tunnel Syndrome (puts tension on ulnar nerve at elbow).
13. Palpate the ulnar nerve.
Orthopedic Physical Therapy Examination of the Wrist and Hand
1. Observe the hand positioned on a pillow or a table. Ensure you have adequate exposure.
2. Observe the palm of the hand.
3. Observe the dorsum of the hand.
4. Review the anatomy of the hand noting the tip of the styloid process, the anatomical snuffbox bordered by extensor pollicis brevis and extensor pollicis longus tendons and the abductor pollicis longus.
5. Feel for tenderness.
6. Test active movements of the wrist.
7. A useful method for screening of flexion and extension of the wrists.
8. Test passive movements of the wrist beginning with extension.
9. Flexion.
10. Radial deviation.
11. Ulnar deviation.
12. Pronation.
13. Supination.
14. Test thumb extension.
15. Test thumb abduction.
16. Test thumb adduction.
17. Test opposition.
18. Observe movement of fingers from extension to flexion.
19. Test flexor digitorum profundus function by holding the proximal interphalangeal joint extended and asking the patient to flex the finger. Successful finger flexion indicates the tendon is intact.
20. Test flexor digitorum superficialis function by holding the other fingers extended while asking the patient to flex the finger being tested. Successful flexion indicates the tendon is intact.
21. Assess joint hyperextension.
22. Axial compression test.
23. Asses ulnar nerve function with Froment's test.
24. Asses ulnar nerve/interosseus muscle function by asking the patient to abduct their fingers while slowly pushing the hands together until the weaker one collapses.
24. Asses ulnar nerve/interosseus muscle function by asking the patient to abduct their fingers while slowly pushing the hands together until the weaker one collapses.
25. Assess median nerve function.
26. Assess the function of the hand with the fine pinch grip (paperclip).
27. Flat pinch grip (key).
28. Tripod grip (pen).
29. Wide grip (mug).
30. Power grip.
Orthopedic Physical Therapy Examination of the Back
1. Observe the patient as a whole, front and back.
2. Ask the patient to walk on their toes.
3. Ask the patient to walk on their heels.
4. Back extension.
5. Back flexion.
6. Bony Excursion: measure the distance between two bony points when standing.
7 Ask the patient to flex forward, the bony points should move at least 5 cm.
8. Lateral flexion
9. Rotation (make sure to anchor pelvis)
10. FABER test in Orthopedic Physical Therapy Examination:
Flexion Abduction External Rotation. Press firmly on the knee. Pain in the groin suggests a hip problem and pain in the back refers to the sacroiliac joint.
11 Straight leg raising, dorsiflexion increases the sciatic stretch. Watch for pain and limitation.
12. Femoral stretch test: Hip extension and passive flexion of the knee. Watch for pain and limitation.
A Neurological examination including:
13. Knee extension.
14. Knee flexion
15. Knee jerk reflex
16. Ankle jerk reflex.
17. Sensation
18. Pain on compression of the head can often be attributed to non-organic pathology.
Orthopedic Physical Therapy Examination of the Hip
1. Observe the whole patient.
2. Trendelenburg test (normal).
3. Positive Trendelenburg Test.
4. Ask the patient to walk and observe their gait.
5. Test iliopsoas function by asking the patient to lift their thigh off the seat against resistance
6. Ensure the Anterior Superior Iliac Spines are horizontal.
7. Check the position of the medial malleoli.
8. Measure from the ASIS to the medial malleoli.
9. Measure the distance from the xiphisternum to the medial malleoli.
10. Feel for the femoral head. It is deep to the femoral pulse.
11. Thomas Test in Orthopedic Physical Therapy Examination:
Flex both hips to eliminate the lumbar lordosis. Extend the hip you are examining and if it is normal it should return to the bed. A fixed flexion deformity of the hip will not allow it to extend to the neutral position.
12. Check the patient is not compensating with a lumbar lordosis.
13. Check the ASIS are horizontal again. Anchor leg over the edge of the bed and abduct the other hip.
14. Assess adduction.
14. Assess adduction.
15. Internal rotation.
Orthopedic Physical Therapy Examination of the Knee
1. Observe the patient as a whole.
2. Observe the knee joint front and back. Note any genu valgum (a slight degree of which is normal) or genu varum.
3. Observe knee from side. Note any genu recurvatum.
4. Ask the patient to squat.
5. Assess patellae tracking from extension to flexion. Note quadriceps action.
6. Patellar apprehension test. Apply lateral pressure to patellar as the patient flexes the knee. Observe facial expressions for fear of impending dislocation.
7. Observe the knee with the patient lying on the bed.
8. Pick a bony landmark on the knee and measure a fixed distance from it to the approximate centre of the quadriceps.
9. Measure the circumference of the of the knee and leg.
10. Feel the temperature of the knee and leg.
11. Soloman's test. Lift the patella away from the femur. In synovial thickening it will be hard to grasp.
12. Effusion: Tap Test. Push sharply on the patella and with an effusion it will strike the femur and bounce back.
13. Effusion: Feel for fluid fluctuance.
14. Effusion: Bulge Test. Empty the suprapatellar pouch with pressure above the patella. Wipe hand along the medial side to displace fluid laterally. Compress the lateral side and watch for a bulge medially.
15. Feel the superficial and posterior surface of the patella by pushing it medially.
16. To test for patello-femoral tenderness press patella against the femur and ask the patient to tighten their thigh muscles.
17. Palpate for tenderness with the knee flexed to 90°. Feel along the joint line, the ligaments and the tibial tubercle.
18. Assess extension of the knee.
19. Flexion.
20. Internal and external rotation of the knee is limited.
21. Test collateral ligaments by applying medial and lateral pressure to the lower leg which is tucked away under the examiners arm.
22. Look for posterior sag of the femur signifying posterior cruciate dysfunction.
23. Anterior drawer test. Femur should not move forward significantly unless the anterior cruciate ligament is torn.
24. Posterior drawer test. (Posterior cruciate)
25. Lachmans test.
26. MC test - lift leg off the bed and if tibia drops there is cruciate dysfunction.
27. MacMurrays test: Place the thumb and finger on the joint line. Watching the patients face for pain, flex the leg, externally rotate the foot, abduct and extend leg to test for medial meniscal "clicks".Flex the leg, internally rotate and adduct for lateral meniscal "clicks".
28. Ask the patient to lie prone and examine the back of the knee.
Orthopedic Physical Therapy Examination of the Ankle and Foot
Read more on Journal of Orthopaedic and Sports Physical Therapy
Observe patient as a whole from front and back.
1. From behind check hind-foot alignment and "too many toes" sign (tib. post dysfunction).
2. & 3. Check for inversion (tibialis function) and eversion (peroneal function).
4. Single stance heel raise test.
5. Windlass test.
6. Coin test.
7. Dorsi flexion.
8. Plantar flexion.
9. Mid foot abduction/adduction.
10. Extension fore foot.
11. Flexion fore foot.
12. Tib. anterior test.
13. Tib. posterior test.
14. Peroneal tendons test.
15. Ankle instability - inversion test.
16. Ankle instability - Anterior draw test.
17. Ankle instability - Posterior draw test.
18. Simmond's test for TA.
19. Examine the sole.
20. Check pulses, sensation, reflexes.
What Other Visitors Have Said
Click below to see contributions from other visitors to this page...

Sign of the Buttock Not rated yet
The Sign of the Buttock is a collection of signs that indicate a serious pathological problem with severe pain in the gluteal region and occasionally …
Isometric Contraction Not rated yet
Isometric Exercise (Static Exercise)
In isometric contraction, muscle fiber length is constant, so muscle contraction occurs without joint movement. …
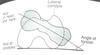
femoral anteversion Not rated yet
A pathological increase in angle of torsion is called femoral anteversion, and a pathological decrease in the angle or reversal of torsion is known as …
Coxa Valga Not rated yet
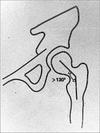
A pathological increase in the medial angulation between the neck and the shaft is called coxa valga , and a pathological decrease is called coxa vara …

Coxa Vara Not rated yet
If the angle of inclination of the femoral neck to the shaft in the frontal plane exceeds 130 degrees then it is known as coxa valga ; an angle less …
Return from Orthopedic Physical Therapy to Home page
Recent Articles
|
Author's Pick
Rating: 4.4 Votes: 252 |

 About Prodyut Das (PT, DPT) Physical Therapist at SMC, New York, USA. Former PT Winner Regional Health, South Dakota, Former HOD Physiotherapy & Fitness center @ NIMT Hospital, Greater Noida. Former PT ISIC Hospital. DPT ( Univ of Montana), MPT (neuro), MIAP, cert. manual therapist, Medical Neuroscience (USA). Licensed Physical Therapist in NY and Texas, USA. |
Connect with me- |
© Copyright physiotherapy-treatment.com since 2009 |