Enhance your health with free online physiotherapy exercise lessons and videos about various disease and health condition
Walking Crutches
Walking Crutches:
There are 3 basic types of walking crutches and they are used to reduce weight bearing on one or both legs, or to give additional support where balance is impaired and strength is inadequate.
- Axillary Crutches
- Elbow Crutches
- Forearm Crutches
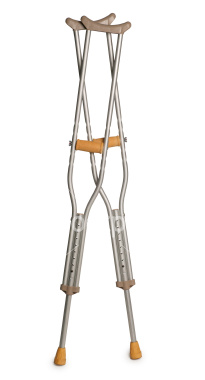
I. Axillary Crutches:
They are made of wood with an axillary pad, a hand piece and a rubber ferrule. The position of the hand and the total length are usually adjustable. The axillary pad should rest against the chest wall approximately 5 cm below the apex of the axilla and the hand grip should be adjusted to allow the elbow to be slightly flexed when weight is not being taken. Weight is transmitted down the arm to the hand piece. The elbow is extended. Weight should not be taken through the axillary pad as this could lead to a neuropraxia of the radial nerve or brachial plexus.
Measurement of length It is usually carried out with patient in lying.
With shoes off measure from apex of the axilla to the lower margin of the medial malleolus.
With shoes on 5cm below the apex of the axilla to a point 20 cm lateral to the heel of the shoe. This tends to be less accurate than the first method.
The measurement from the axillary pad to the hand grip should be taken with the elbow slightly flexed (approximately 15 degree) from a point 5 cm below the apex of the axilla to the styloid process.
II. Elbow Crutches:
They are made of metal and have a metal or plastic forearm band. They are usually adjustable in length by means of a press clip or metal button and have a rubber ferrule. These crutches are particularly suitable for patients with good balance and strong arms. Weight is transmitted exactly the same way as axillary crutches.
Measurement of length It is usually carried out with patient in lying with shoes on. The elbow slightly flexed (approximately 15 degree) and the measurement is taken from the ulnar styloid to a point 20 cm lateral to the heal of the shoe. Once the patient is standing with support, the length must be checked.
II. Forearm Crutches/ Gutter crutches/ Adjustable arthritic crutches:
They are made of metal with a padded forearm support and strap, an adjustable hand piece and a rubber ferrule. These are used for patients with rheumatoid disease, who require some form of support but cannot take weight through hands, wrists and elbows because of deformity and/or pain.
Measurement of length If the patient can stand, it is better to assess the required length in this position from elbow to the floor. Measurement can be carried out with the patient lying with shoes on, and is taken from the point of flexed elbow to 20 cm lateral to the heel.
Preparation for crutch walking:
Arms The power of the extensors and adductors of the shoulder and the extensors of the elbow must be assessed and if necessary strengthened before the patient starts walking. The hand grip must also be tested to see that the patient has sufficient power and mobility to grasp the hand piece.
Legs
Non weight bearing- The mobility and strength of the unaffected leg should be assessed, paying particular attention to hip abductors and extensors, the knee extensors and the plantar flexors of the ankle. These muscles must be sufficiently strong to take weight.
Partial weight bearing- The mobility and strength of both legs should be assessed and muscles strengthened where necessary.
Balance Sitting and standing balance must be tested and trained if necessary.
Demonstration
The physiotherapist should demonstrate the appropriate crutch walking to the patient.
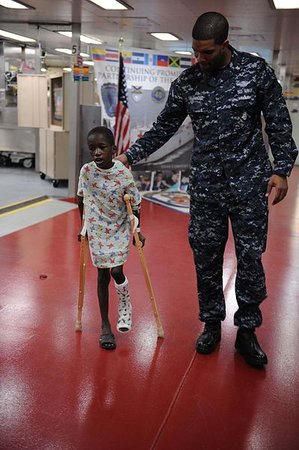
Walking with Crutches:
Four-Point Crutch Gait:
Indication:Weakness in both legs or poor coordination.
Pattern Sequence:Left crutch, right foot, right crutch, left foot. Then repeat.
Advantages:Provides excellent stability as there are always three points in contact with the ground
Disadvantages:Slow walking speed
Three-Point Crutch Gait:
Indication:Inability to bear weight on one leg. (fractures, pain, amputations)
Pattern Sequence:First move both crutches and the weaker lower limb forward. Then bear all your weight down through the cruthes, and move the stronger or unaffected lower limb forward. Repeat.
Advantages:Eliminates all weight bearing on the affected leg.
Disadvantages:Good balance is required.
Two-Point Crutch Gait:
Indication:Weakness in both legs or poor coordination.
Pattern Sequence:Left crutch and right foot together, then the right crutch and left foot together. Repeat.
Advantages:Faster than the four point date.
Disadvantages:Can be difficult to learn the pattern.
Swing-Through Crutch Gait:
Indications:Inability to fully bear weight on both legs. (fractures, pain, amputations)
Pattern Sequence:Advance both crutches forward then, while bearing all weight down through both crutches, swing both legs forward at the same time past the crutches.
Advantage:Fastest gait pattern of all six.
Disadvantage:Energy consuming and requires good upper extremity strength.
Swing-To Crutch Gait:
Indications:Patients with weakness of both lower extremities.
Pattern Sequence:Advance both crutches forward then, while bearing all weight down through both crutches, swing both legs forward at the same time to (not past) the crutches.
Advantage:Easy to learn.
Disadvantage:Requires good upper extremity strength.
Tripod Crutch Gait:
Indications:Initial pattern for patients with paraplegia learning to do swing to gait pattern.
Pattern Sequence:Advance the left crutch, then the right crutch, then drag both legs to the crutches
Advantage:Provides good stability.
Disadvantage:Very energy consuming.
Standing Up with walking crutches:
Put both crutches on your injured side. Lean forward and push off with your arm from the chair.
Sitting Down with walking crutches:
Remove the walking crutches and place both of them together on your injured side. Hold onto the hand grips with one hand. Use your other hand to hold onto the arm rest or edge of the chair and slowly sit down.
Stairs:
Do not attempt to climb stairs or curbs until you have complete confidence in using your walking crutches. For safety reasons, you can sit down and scoot up and down the steps on your bottom if needed. If you have a rail, put both walking crutches under one arm and hold onto the rail for safety.
Going up stairs with or without a railing:
- Keep the walking crutches on the stair you are standing.
- Support your weight between your walking crutches.
- Bring your good leg up to the next step. Let the injured leg trail behind.
- Straighten your good leg and bring the walking crutches and your injured leg up.
Going down stairs:
- Put the walking crutches on the lower step while putting your injured foot forward.
- Support your weight between your walking crutches.
- Move your good foot to the lower step.
Getting Into and Out of a Car with walking crutches:
Read more about using crutches in Medline Plus
- Have someone open the door and move the seat back as far as they can.
- Back up until you feel the edge of the seat. Grab the back rest with one hand and the hand grips of the crutches with the other.
- Tip your head to avoid bumping it. Stand up or sit down using your good leg to bear your weight. To sit down, put the heel of your good leg on the car frame and push back. Move across the seat until your injured leg can be swung into the car.
Return from walking crutches to home page
Recent Articles
|
Author's Pick
Rating: 4.4 Votes: 252 |

 About Prodyut Das (PT, DPT) Physical Therapist at SMC, New York, USA. Former PT Winner Regional Health, South Dakota, Former HOD Physiotherapy & Fitness center @ NIMT Hospital, Greater Noida. Former PT ISIC Hospital. DPT ( Univ of Montana), MPT (neuro), MIAP, cert. manual therapist, Medical Neuroscience (USA). Licensed Physical Therapist in NY and Texas, USA. |
Connect with me- |
© Copyright physiotherapy-treatment.com since 2009 |