Enhance your health with free online physiotherapy exercise lessons and videos about various disease and health condition
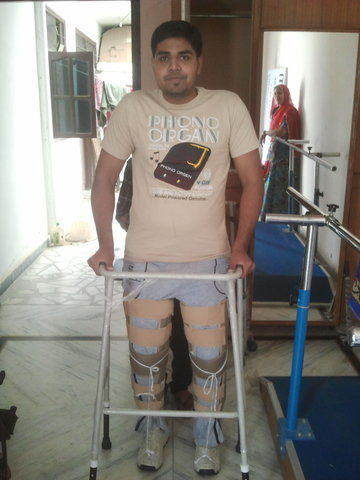
Walking after Spinal Cord Injury
Walking after Spinal Cord Injury:
The first question that arises in the patient’s mind while he/she is on bed is:
Will I ever walk again?
Inability to walk is the major disability a patient of SCI has. The patient experiences immense social pressure to attain his upright posture and to walk again. Patients having complete lesion above T10 are generally unsuitable for locomotion and they are considered for wheel chair mobility. Whereas patient having lower level lesion or patient with incomplete lesion who has some strength in one or both hip flexors and or quadriceps are more likely to achieve a successful ambulation with the help of some kind of orthosis.
Walking after spinal cord injury leads to large number of physiological benefits in the patient. Some of these are:
- Walking after spinal cord injury provides psychological influence on patient.
- Walking after spinal cord injury reduces spasticity.
- Walking after spinal cord injury improves digestion.
- Prevents pressure sores.
- Prevents heterotrophic ossification.
- Prevents chances of osteoporosis.
- Improves blood circulation.
- Improves postural sensibility and vasomotor control.
Walking after spinal cord injury should be initiated in the patient as soon as patient has mastered in transfer, bed, mat and wheel chair activities. The main aim of Walking after spinal cord injury is to teach functional ambulation to the patient. But there are many physical factors which determine whether a patient can achieve functional Walking after spinal cord injury or not. The first and the foremost, being the level of lesion.
Other physical factors affecting Walking after spinal cord injury include:
Spasticity, spinal and limb deformities, coordination, stability, renal abnormalities and pressure sores.
Patient’s age, weight, intelligence and motivation also determine his ability to walk. To become a functional ambulatory, patient must possess adequate muscular strength, postural alignment, ROM and sufficient cardiovascular endurance. Patient with high level lesion cannot achieve ambulation because of their inability to stabilize the trunk and pelvis.
A normal walking after spinal cord injury comprises of three basic components. These are:
- a) Stability
- b) Mobility
- c) Control
Walking in SCI patient is assisted with the help of orthosis. The use of orthosis varies according to the level of lesion. For i.e.:
- Patient with lesion above T10 requires KAFO along with pelvic band, night splint for walking after spinal cord injury.
- Patient with lesion below T10, requires KAFO along with pelvic band, night splint is not necessary.
- Whereas patient with lower lumber or incomplete lesion, requires KAFO only for walking after spinal cord injury.
Preparation for gait training for spinal cord patients:
Maintenance of posture is very important before teaching walking after spinal cord injury. The patient must learn to pay attention to sensations in the upper trunk and also learn to compensate for loss of equilibrium reactions in legs and lower trunk.
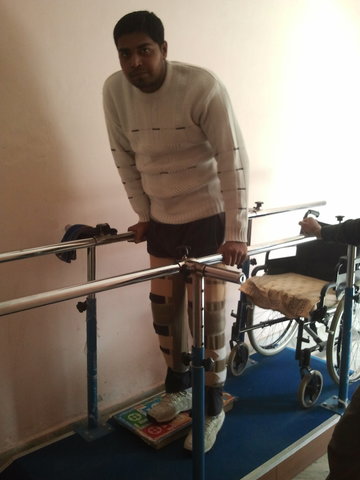
Prior to ambulatory training balance exercises are taught to the patient to locate his point of balance, learn control of body segments and master in body weight shifting. Balance exercises while standing are taught first in parallel bars and then on mat. Before making patient to stand on parallel bar from wheel chair, putting and removing of orthosis is taught. Putting on and of the orthosis is usually done in sitting and supine position. While standing the locks of the orthosis should be properly locked to prevent falling and maintain stability.
After the fitting of orthosis patient is given appropriate training to stand from the wheel chair with the help of parallel bars and then progression is made with the use of crutches.
Standing from wheel chair is taught as:
- Patient brings his wheel chair near parallel bar.
- Locks the brakes of the wheel chair.
- Patient slides to the edge of the chair and puts his both limbs on the ground with the help of hand.
- Now knee joint of orthosis is locked in extension.
- Patient grasps the bar with the help of hand.
- Now by transferring the body weight over hands, patient pulls his body in standing position.
Once in upright position between parallel bars, training for different activities such as balancing, co-ordination and strengthening are taught to the patient.
The parallel bar activity can be graded as:
- Initial parallel bar activities.
- Advanced parallel bar activities.
Initial parallel bar activities:
Balancing in parallel bar:
a) Standing:
- Patient’s face pointing straight in front and pelvis forward.
- Feet are kept approximately 4 inches apart to maintain proper support.
- Hands are placed on the bar slightly in front of body.
- Weight of body equally distributed over both the palms and feet.
b) Weight transference laterally:
Patient stands with parallel bars and shifts the body weight on one foot the other by alternately pushing over bar. This alternate weight transfer may be done rhythmically causing the moving leg to react repeatedly.
c) Weight transference backward:
- Patient in standing position.
- Patients transfer body weight on to hands.
- At the same time flexes the elbow, causing ankle to be dorsiflexed.
- Thus, patient tilts backward.
d) Weight transference forward:
- Patient in standing position.
- Patient transfer his body weight to hands.
- Tries to stand on toes by slightly tilting forwards.
e) Arm raising forward:
- Patient in standing position.
- Body weight is transferred to both the feet equally.
- Now, elevate one arm forward to shoulder level.
- Bring the arm back and hold the bar.
- Repeat with other arm.
- Progression is made by elevating both arms simultaneously.
f) Arm raising sideward:
In this procedure, activities are performed, same as above but the arms are raised at sides.
g) Arm swinging:
- Body weight is distributed equally over both the feet.
- Hands are removed from parallel bar gently and kept at the side of the body.
- Now, swing the arm forward and backward.
- If balance is disturbed, grasp the bar.
Strengthening exercises in parallel bar:
a) Push-up:
This activity requires significant upper limb strength.
- Hands are placed over parallel bar just interior to thighs.
- Body weight is lifted upwards by pushing down the parallel bar with simultaneous elbow extension and shoulder depression.
- Starting position is gained by controlled lowering of body.
b) Stepping forward and backward:
- Patient steps forward with one leg.
- Body weight is shifted anteriorly on the forward leg.
- Patient returns to the starting position.
This is alternated with stepping backward with one leg, shifting the body weight posteriorly on the backward leg and return to start position
c) Dipping activity:
- Patient stands with hands placed forward.
- Body weight is shifted forward on hand by flexing the hip and elbows.
- Flexion of hip is done till trunk is parallel to floor.
- Starting position is returned by straightening the elbows.
Co-ordination exercises in parallel bar:
a) Patient standing between parallel bars distributes his weight on both lower limb and then raises both upper limbs forwards and sideward’s, again forwards and then to starting position.
b) Hip hiking: Patient shifts his body weight to one side and by pushing over parallel bar of same side, raises the hip of other side. Return to starting position.
c) Leg swinging: Patient rises his one leg in the same manner described above and swings the raised leg forward and backward for several counts.
Advanced parallel bar activities:
In advanced parallel bar activities, patients are given initial gait training to teach basic fundamentals of gait and to develop proper gait patterns and habits.
Forward progression:
a) Drag to gait:
- Patient in standing position with both hands kept forward.
- Body weight is shifted to hand by slight flexion of elbows.
- Now patient forcefully pushes the bar downwards by straightening the elbows and depressing the shoulder.
- Body is brought to the line of hand along the floor.
b) Swing to gait:
All the activities performed is same as above, except lifting body of the floor and swinging forward instead of dragging it.
c) Swing through gait:
Same as above, except the body is swing forward and feet are kept beyond the line of hand.
d) Four point gait:
- Patient keeps his right hand forward and shift body weight to right side.
- Patient raises the left hip and keeps the left leg forward.
- Patient keeps his left hand forward and shift body weight to left side.
- Now right hip is raised and right leg is kept forward.
The rest of the distance is covered in same manner.
Sideward progression:
Functional electrical stimulation
Another option to use with or instead of braces is electrical stimulation. Functional electrical stimulation (FES) (also called neuroprosthesis) stimulates certain muscles in the legs to do the same job as a brace during walking. For example, a cuff with electrodes (material that transfers an electric current) may be placed around the lower leg that stimulates the muscle that picks up the foot as you take a step. If it works well for you, this may be used in place of a plastic AFO.
The electrodes for electrical stimulation may also be on separate small pads (without the cuff) on the skin or be surgically implanted.
Patient stands between parallel bar facing one bar with both hands on same bar. This activity is performed actively. Progression is made by applying manual resistance at pelvis and thigh
Activities include:
- Move right hand more towards right side and shift the body weight towards left side.
- Now, raised the right leg and move it towards right side and shift body weight towards right side.
- Repeat the same activity with left leg.
Sideward progression facilitates active abduction of moving limb. It also helps in controlled mobility and weight bearing of opposite supporting limb.
Backward progression:
All the activities in this progression is same as that of 4 point forward progression except that all the movements are made in backward direction instead of forward direction. This activity also combines hip extension with knee flexion.
Throughout the regime described above, physiotherapist must assist or guard the patient. Guarding of the patient develops psychological confidence, prevents instability and helps to built rapport.
After that, the patient’s mastery over parallel bar activities progression is made with other devices. Before continuing with the progression of gait training activities outside the parallel bar, emphasis is given over:
- Selection and measurement of appropriate device (walker, crutches etc).
- Selection of gait pattern along with each device.
Generally in patient of paraplegia, gait training is started with the help of axillary crutches and then progression is made for forearm crutches is that it increases the functional capacity of person during stair climbing.
A crutch given to a patient should properly fit according to his body and for this purpose proper measurement can be done either in standing position or in supine position.
Prior to walking after spinal cord injury with the help of crutches balancing and co-ordination activities, as performed in parallel bars should be practiced with the crutches. When patient becomes master in these activities, gait training with the help of crutches is given. The gait pattern on level surface is taught with the help of axillary crutches. For ascending and descending stairs, forearm crutches are preferred.
Gait pattern after SCI
Body-weight support device LOKOMAT
If you are eventually walking after spinal cord injury with assistive devices or braces, you may still continue gait training on a body-weight support device to help increase your speed and improve your balance and the timing, coordination, and symmetry of your steps. This is performed without using walking devices or braces. You will receive verbal instructions and manual assistance from your therapist and team.
All levels of gait training activities can be practiced safely in the harness of the body-weight support device, because you cannot fall.
Continued gait training with your therapist will hopefully improve your balance and strength so that you can rely less on devices or braces.
Gait pattern are selected on the basis of patient’s balance, co-ordination, muscle function and weight bearing status. Before giving training for specific gait pattern, some points must be considered.
Such as:
- The body weight should always be borne on hand and not on axillary bar.
- Crutch should be kept at proper distance from foot to make good base of support.
- The axillary bars of the crutches should be held close to chest wall.
- During walking after spinal cord injury a good postural alignment must be maintained.
Gait patterns are taught to the patient according to their level of injury. Progression is made from easier one to harder one.
a) Drag to gait:
- Both crutches are kept forward simultaneously.
- Body weight is shifted over hand by flexion the elbows.
- Now, patient pushes down on the hand rest and drags his feet along the floor in line of crutch.
b) Swing to gait:
In this gait pattern, all the activities are some as that of drag to gait except that the feet are lifted from the floor and swing to the line of crutches instead of dragging them.
c) Swing through gait:
- Both crutches are moved forward simultaneously.
- Body weight is shifted over hands by flexing the elbows.
- Now patient lift his body off the ground by pushing over hand rest and swings beyond the line of crutches.
- Crutches are again brought to starting position.
d) Four point gait:
This pattern provides a slow, stable gait. In this gait, weight is borne on both lower extremities. During ambulation, first one crutch is advanced forward from starting position and then the opposite lower extremity is moved. Progression is made by other crutch and leg.
For e.g. if right crutch is moved first then the left lower limb will advance and then left crutch followed by right lower limb.
e) Two point gait:
This gait is usually not performed by paraplegic patient. Only those patients who have great stability can perform this gait pattern. This gait provides less stability as compared to 4-point gait.
In this gait the opposite crutch and limb are advanced forward together from the starting position and then movement is continued in similar manner. The patient with their orthosis performed this entire gait pattern. A gradual emphasis should be placed on improved timing and speed.
SCI Related Pages


Stair Climbing after SCI
After giving these training, patient should become master of walking after spinal cord injury on the leveled surface. Once the patient gains confidence on level surface, gait training progression is made for stair climbing. During stair climbing training patient are always advised to use the railing if it is present.
For stair climbing, using a railing both crutches are held in one hand. Forearm crutches should always be preferred for stair climbing because these crutches improve function by allowing unrestricted movement at the shoulder.
Ascending stairs:
The easiest pattern of ascending stair is usually to climb the stairs backwards i.e. patient facing the lower step. Steps with handrail must always be preferred, as it gives extra confidence to the patient. While climbing, one hand is over handrail and other crutch in hand, as hands are free in forearm crutch.
Position of patient:
• Patient standing on stairs with one forearm crutch and facing downward.
Action of Patient:
Patient can move upstairs either by four point gait or by swinging both legs upwards together. Four point gait pattern is slower and more stable.
Four point gait pattern:
- Patient puts his crutch on the back step.
- Lift his opposite leg and keeps on the back step.
- Now, the hand on handrail in also moved backward.
- Patient lifts his other leg by putting bodyweight over handrail and crutches.
Swinging Pattern:
- Crutch is placed on back step.
- Elbows are extended and shoulders are depressed.
- Body is lifted up with simultaneous flexion of head and trunk.
- Lower limb becomes free from body weight and creates momentum to move on higher step.
Descending stairs:
4 Point Gait:
Same as ascending but movement is done in downward direction.
Swinging pattern:
Position of patient-
Patient standing on step with crutch, facing the lower step.
Action of patient:
- Crutch remains on the same step.
- Head and trunk are slightly flexed.
- Now, body is lifted up by extending the elbows and depressing the shoulders.
- Lower limb be free from body weight and creates momentum to move to lower step.
Further Reading for Walking after Spinal Cord Injury
- Scivoletto G, Tamburella F, Laurenza L, Torre M, Molinari M. Who is going to walk? A review of the factors influencing walking recovery after spinal cord injury. Frontiers in Human Neuroscience. 2014;8:141. doi:10.3389/fnhum.2014.00141.
- Spinal Cord Injury and Gait Training- Written by MSKTC Experts- See more at: http://www.msktc.org/sci/factsheets/Gait-Training-and-SCI#sthash.kZ1VVOka.dpuf
- Shin JC, Kim JY, Park HK, Kim NY. Effect of Robotic-Assisted Gait Training in Patients With Incomplete Spinal Cord Injury. Annals of Rehabilitation Medicine. 2014;38(6):719-725. doi:10.5535/arm.2014.38.6.719.
- Neuroplasticity After Spinal Cord Injury and Training: An Emerging Paradigm Shift in Rehabilitation and Walking Recovery- Andrea L Behrman, Mark G Bowden, Preeti M Nair- http://ptjournal.apta.org/content/86/10/1406
Return from walking after spinal cord injury to SCI Rehab
Return from walking after spinal cord injury to Home page
Recent Articles
|
Author's Pick
Rating: 4.4 Votes: 252 |

 About Prodyut Das (PT, DPT) Physical Therapist at SMC, New York, USA. Former PT Winner Regional Health, South Dakota, Former HOD Physiotherapy & Fitness center @ NIMT Hospital, Greater Noida. Former PT ISIC Hospital. DPT ( Univ of Montana), MPT (neuro), MIAP, cert. manual therapist, Medical Neuroscience (USA). Licensed Physical Therapist in NY and Texas, USA. |
Connect with me- |
© Copyright physiotherapy-treatment.com since 2009 |